
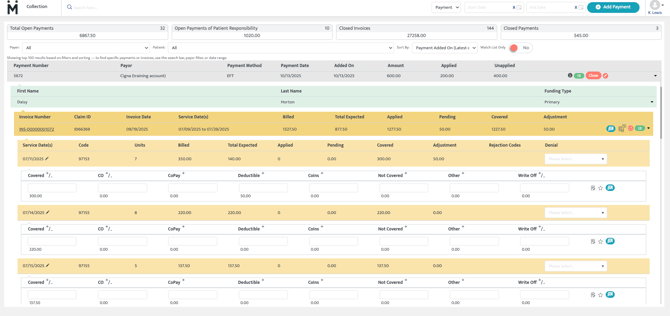
Upon selecting the Collections Module from the main menu, users are presented with a list of all payments received. Each row represents one EOB. The table provides key details such as the payment number, payor’s name, payment method, date of payment, the total amount of the payment, how much of that payment has been applied to invoices, and the remaining unapplied balance.
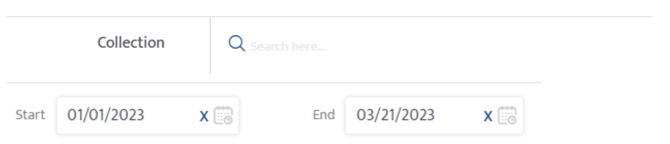
Search & Filters
Users can search for payments using the payor name, payment number, or patient name. By default, the collections page shows all payments that are not closed. Use the date range filter to filter the open payments within a specific date range. Use the search feature to view payments regardless of open or closed status. Users can also search by patient name, invoice number, payment number, or Motivity claim ID.
Unapplied Payments
The Unapplied Amount column indicates how much of the payment has yet to be applied to invoices. Until this amount is fully allocated, the payment should remain open and should not be moved to the closed invoices.
![]()
Icons
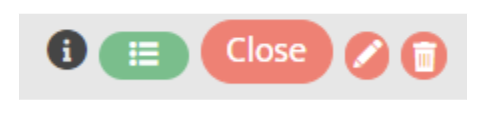
- Info Icon: Provides payment information, including reference numbers and payment dates.
- Timeline Icon: Displays the payment history, showing when and which user posted or updated the payment.
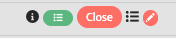
- Close Payment Button: Once all amounts are applied and the payment is fully reconciled, the Close button will turn green, signaling the user to close the payment. The payment is then stored in the Closed Payments section located in the upper right-hand corner of the screen.
- Edit Icon: Allows the user to edit payment details such as payment amount if necessary.
- Delete Icon: Allows the user to delete payments that have not been applied to any invoices. (Icon will no longer appear once the payment is applied fully or partially to a date of service)
- EDI Icon: Displays payments received through an EDI 835 file.
(Will appear as a black hamburger menu only once ERA enrollment has been completed via associated clearinghouse)
Adding a Payment
Users can add payments in four different ways to accommodate various types of transactions:
EDI 835 (Automatic Payments from clearinghouse)
Payments received via an EDI 835 file from the clearinghouse are automatically listed and matched to invoices with open balances. The system matches the payments by the Claim Row ID. If found, the payment is automatically linked to the corresponding claim line.
If Claim Row ID is unavailable or does not yield a match, the system compares the CPT code, Date of service (DOS), and billed amount. A match is created only if all three parameters align.
If no matches are found, the record is also marked as Not Found . Manual intervention may be required to fully reconcile the payment.
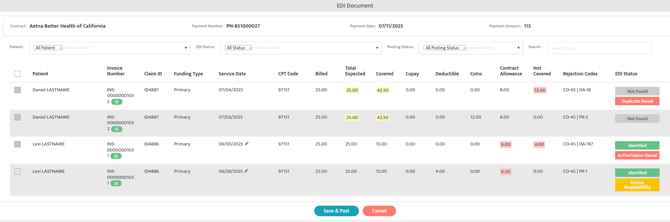
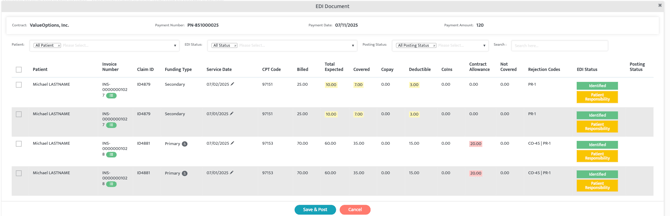
Smart Visuals within ERA
Intelligent color highlights and alternating row patterns to help you quickly identify key trends, overpayments, contractual obligations, and anomalies without scanning the ERA line by line.
- Fully Covered (Green): If Total Expected = Covered, both fields are highlighted green.
- Overpayment (Yellow): If Covered amount >Total Expected, both fields are highlighted yellow, flagging potential overpayments.
- Payment & Patient Responsibility remains (Yellow): If Total Expected = Covered + Copay +
Deductible + Coinsurance, all non-zero values are highlighted yellow. - Contractual Obligation or CO (Red): If Total Expected > Covered + Patient Responsibility and Contract Allowance > 0, the Contract Allowance field is highlighted red.
- Not Covered (Red): Any non-covered amount greater than zero is highlighted red.
Manual Payment Entry
Users can manually add payments by selecting the blue Add Payment option and entering the payment details such as the funder, payment date, payment method, and amount. Users can then manually apply the payment to the patients with open balances with the specified funder.
To add a payment, use the Add Payment button on the top right of the Collections Module page.

Payments can be added as a Cash Receipt or EDI (with EDI file attachment being mandatory).
Once the payment is added, the user will then select the gray payment line, select the patient located on the green line, select the date of service located on the orange line, enter the payment information such as the covered amount, CO, Copay, Deductible, or Coins as listed on the EOB/ERA. Select Save & Post when finished to save the payment allocation.
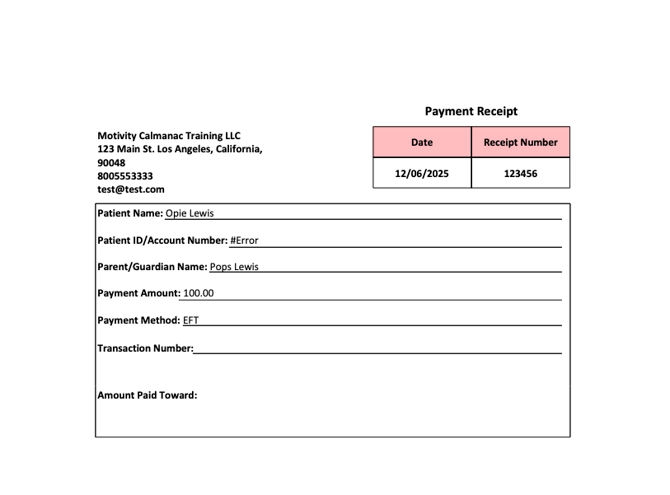
Advance Payments
Payments received in advance can be held in the system until an invoice is generated. These payments are not applied until the relevant patient responsibility invoice is generated.
- Select "Add Payment" (upper right-hand corner of screen)
- under "Cash Receipt Type" select "Advanced Payment"
The user will then select the patient and person financially responsible for services under the contract name, enter the payment method, number, date, and amount.


The option to Save & Print, Save, and Cancel appear. If the user selects Save & Print, the system will generate a payment receipt to provide to the financially responsible party. If the user simply selects "Save" a receipt is not generated at this time. The receipt can be generated if the user selects the "red pencil icon" and then the option to Save & Print reappears.
Patient Portal Payments
Motivity has an active integration with Stripe. This integration allows patients to make payments through a payment gateway such as Stripe. These payments are automatically placed in the collections payment queue ready to be applied to patient responsibility invoices.
What if I have Payments for older claims from previous systems?
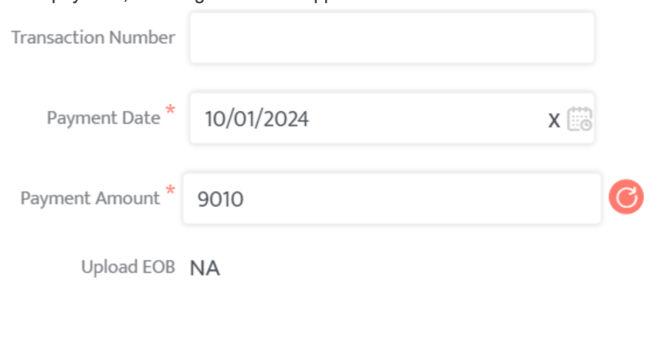
If the payment is for an unrecognized claim (claim that cannot be located within Motivity due to be generated from a previous system or portal), the user will simply adjust the total amount of the payment to reflect the amount that was able to be posted within Motivity by selecting the "red pencil icon" to adjust the total payment amount. The user can then close the payment once fully applied.
Closed Payments & Invoices
Once all amounts have been applied, the user can then select the now green "Close" option. Once selected, the payments and invoices are stored in the Closed Payments and Closed Invoices options. Located at the very top of the collections module. Users can still access and review closed payments if needed by selecting either Closed Invoices or Closed payments and searching for the payment or invoice.

Reopening Payments
If there is a need to adjust a closed payment, users can reopen the payment by selecting Closed Payments to the far right hand side is the blue circle arrow icon. Adjustments can then be made, and the payment can be reapplied as needed.

Reopening Invoice
If there is a need to adjust a closed invoice, users can reopen it by selecting the red circle arrow to reset the amounts applied previously in the Closed Invoices option. Adjustments can then be made, and the amounts can be reapplied as needed.

How Do I apply payments manually and what does each box mean?
Users can view unapplied payments in the payments list located within the Collections module. Selecting a payment opens a detailed view showing the invoices with an open balance under the specified funder and allowing users to manually apply payments to those invoices. Users can apply monetary values to the following categories:
- Covered: Amount paid by the funder.
- CO: the difference between what the provider billed and what the provider is contractually obligated to receive in exchange for services provided.
- Copay/Deductible/Coinsurance: Out of pocket costs the patient is responsible for.
- Not Covered: Services or amounts not covered by the funder, transferred to patient responsibility or secondary payor.
- Write-Off: Adjustments where the provider agrees to write off the remaining balance due to being non-collectible.
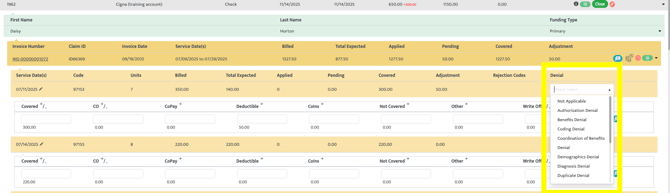
Denial codes can be applied by selecting the Denial reason as listed on the EOB. Selecting a denial category will also transition the denial to the denials module work-list to be worked at a later time.
Use the Save feature to finalize your updates.
Secondary Invoice Generation
Secondary Invoice/Claim
If a patient has a secondary funding source listed under their profile:
- The system will automatically generate a secondary 1500 claim form to transition any remaining balance not covered by the primary funder. The following options transition their balances to the secondary funder: Not Covered/Copay/Deductible/Coinsurance/Other field.
- Secondary invoices are stored within the Posted Invoices subtab of the Billing module under the appropriate secondary funding source.
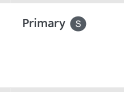
When applying payments from an ERA of a primary funder, there is a black S located next to the Primary Funding type indicating that the patient has a secondary funding source.
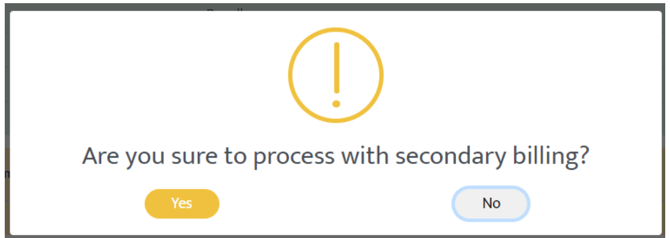
Simply select the check box on the far right of the dates of service you wish to apply this payment to. Once the user selects "Save & Post" at the bottom of the payment, the system will ask "Are you sure you want to proceed?" 
- By selecting "Proceed to Clearinghouse" the user is choosing to create a secondary claim and submit it directly to the clearinghouse. (option is only available when any patient listed on the ERA has a secondary funding source listed within their patient profile).
- By selecting "Proceed" the user is choosing to create the secondary invoice and post it internally which will not allow the claim to leave the system.
If the patient does not have a secondary funder, the remaining balance will automatically be transferred to Patient Responsibility.
Patient Responsibility: Copay/Deductible/Coinsurance Invoice
When copay, deductible, or coinsurance amounts are applied on a claim and secondary payor is not configured in Motivity:
- A new invoice will be created for the copay, deductible, or coinsurance transitioning the balance to patient responsibility.
- This patient responsibility invoice will be available under the Billing module and the Unposted Batches subtab.
Interest Payment
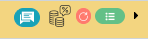
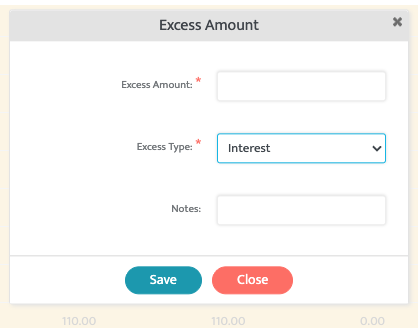
Interest payments received can also be applied through the "stacked change" Icon on the claim row.
Users will simply select the manual payment, patient, and choose a date of service to apply this monetary value to. Simply select the icon, select the "Excess type" as Interest, provide notes and the amount. Select Save once completed.
Adjusting Payment Amounts
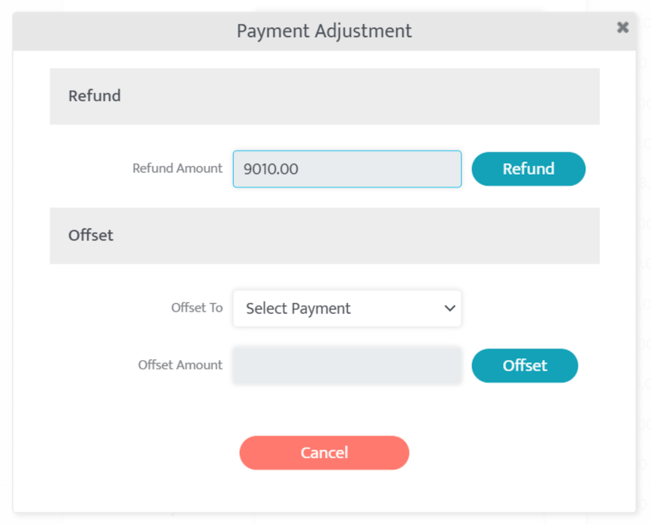
In the event of an overpayment or if a refund is required, users can make adjustments to payments by using the Adjust Payment icon (red circle arrow). Payments can be refunded or offset to another payment, ensuring the appropriate application of funds.
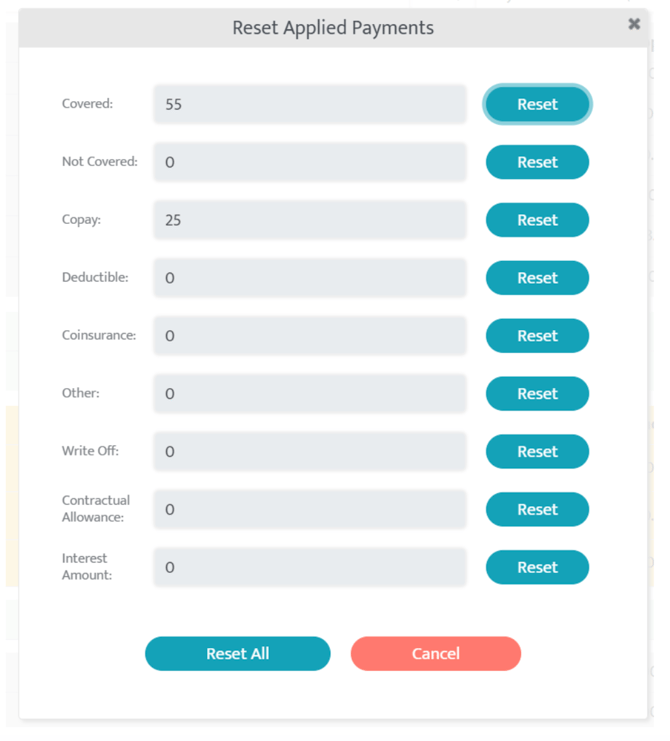
Adjusting Applied Payments
If a payment is applied incorrectly, users can revert the applied amount by selecting the adjustment icon at the claim service level. This reopens the invoice and allows users to reapply the payment correctly. Any associated secondary claims or patient responsibility will be automatically voided and can be regenerated after

Denials and Resubmission Process
If you want to resubmit a claim and avoid passing all denied amounts from the primary payor to the secondary payor, you need to be cautious when using the ‘Save & Post’ function. Do not use 'Save & Post' in this case, as it will automatically send the denied amount to the secondary payor. Instead, use the ‘Resubmit’ option to correct the claim and resubmit it to the primary payor.
When a denial is received:
- The system automatically categorizes the claim and moves it to the Denials page.
- Denials not associated with CO, P1, P2, or P3 will appear here for review.
- You can manually assign denial categories to claims to locate them in the Denials section.
Before resubmitting, ensure that any necessary corrections are made to the contract, patient coverage, authorization, or appointment details. These updates must be done before resubmission to avoid any errors.
How do I make corrections when I already billed the claim?
Contract, Patient Benefit Coverage, and Authorizations corrections can be updated from their respective modules within Motivity.
Appointment Corrections: Once an appointment is billed, it is locked and cannot be changed from the scheduler. However, you can update the appointment by selecting the black pencil icon next to the Date of Service in the Collections Module.


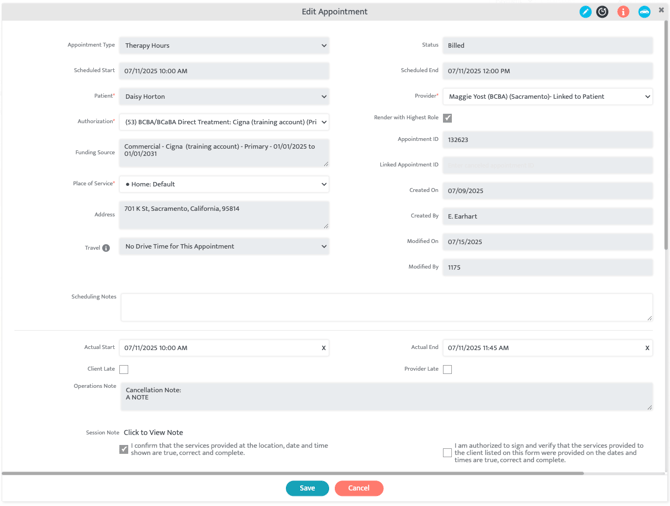
Select "proceed", select the specific appointment you wish to alter, select the blue pencil to make edits to the appointment. After making the necessary changes, save your updates and then select the Resubmit option located at the bottom of the claims screen. The system will regenerate and submit the claim to the clearinghouse at the same time.
When a resubmission is made, the claim will include resubmission code 7 and the original claim ID in the new claim submission. After this process, you will receive clearinghouse updates and can track the newly resubmitted claim within the "Posted Invoices" subtab of the Billing module.