
In the Account Information section, you will enter the core details needed to create and identify the contract. Completing this section establishes the foundation for tracking the contract and enables additional configuration such as rates, authorizations, and billing rules.
Please note: All fields marked with a red asterisk are required before moving forward. Fields highlighted with a red or gray bubble are highly recommended, as they flow directly onto your claims.
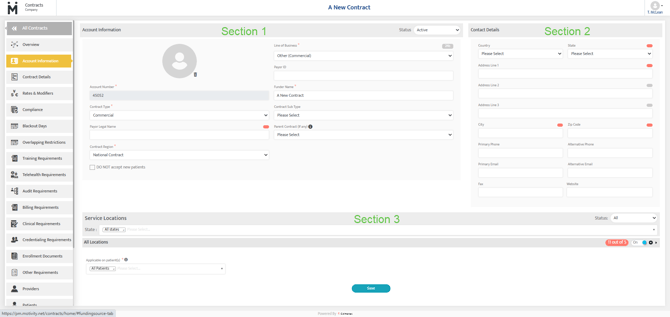
Section 1: Adding Account Information
Status:
Select the current status of the contract. Options may include Active, Submitted, or In Progress. This allows you to track contracts throughout the lifecycle as they are submitted to and accepted by insurance payers.
Contract Display Picture:
Add an display picture to represent the funder associated with this contract. This image will also appear in the Credentialing module and on the Provider Portal in relation to enrollments.
Line of Business:
Select the line of business under which this contract is created, such as Medicaid, Tricare, or Other (Commercial).
Payor ID
This field is to be used if/when applicable for any contract. Not all contracts have a mention of vendor number or payor ID.
Account Number
This is a system generated unique number for every contract.
Funder Name
Enter the internally used or common name for the contract, which may differ from the legal name. This name appears on the contract list and is frequently used in reports, so use a clear, easily recognizable name that follows your organization’s naming conventions.
Contract & Sub Contract Type:
Select the contract type and, if applicable, a sub-type. Examples include Insurance, School, Military, Medicaid State, and others.
Payor Legal Name
This is the precise legal name of the funder given in the contract. This can be the same as a funder name in some cases.
Parent Contract
Configuration:- You can configure any active contract as a Parent Contract, except for contracts that already have an assigned Parent Contract.
- To enable Parent Contract configuration, ensure the Child Contract has its details added.
- If you de-select a Parent Contract, the Child Contract will become independent. Data synchronization will cease, though previously synced data will remain unaffected.
- Once a Parent Contract is de-selected, reassigning a Parent Contract is not allowed.
- When a Parent Contract is configured, the Child Contract will inherit data for rates, compliance, and credentialing from the Parent. The Child Contract's previous data will no longer be available.
- Any updates to locations, rates, compliance, or credentialing in the Parent Contract will be instantly reflected in the Child Contract.
- Provider enrollments are inherited nightly, but changes to individual provider enrollments will sync in real-time from the Parent to the Child Contract.
Contract Region
Select which region in which this contract may be used.
- National - If a contract is applicable for all offices/service locations across the nation
- State - If a contract is applicable for specific states
- Office - If a contract is applicable to specific offices/service locations
- Other
DO NOT accept new patients
Click this checkbox if you do not want to accept new patient with this funding source.
Section 2: Contract Details
In this area, add the funder’s contact information, including address, phone number, and email. This information will be used for correspondence and reference related to the contract.
Section 3: Service Locations & Patients
Service Location State(s)
Using the dropdown, select the specific states where this contract is applicable, or choose All States if the contract applies nationwide.
All Location(s)
In this area, select which office locations accept this contract. You can enable all locations using the On/Off toggle.
To indicate if a specific location does not accept the contract, click All Locations to display a dropdown of your pre-added office locations. Then select the desired office and toggle it On or Off as needed.
Applicable on patient(s)
Use the dropdown to select whether this contract should be available to all patients or only to specific patients. Please note: this does not assign the contract to the patient; it simply makes it available as a funding source option where applicable.
Last Updated: 12/18/2025 by Tiffany McLean