
This page lists all the potential payors based on following criteria-
- If the organization has a contract with the payor for the location where provider is providing services
- If the payor requires Enrollment based on the role of the provider. (For example: many providers might not require a behavior technician to be Enrolled, but some payors might require it. Also, most of the payors will require a BCBA to be Enrolled.)
The requirement of payor is configured in the contracts module.
Ideally a provider should be Enrolled with all the payors at their service location so that they can work on any case at any time, however considering the tedious process of Enrollment and limited resources, credentialing team may choose to process only selected enrollments.
Enrollments: Service Locations
Payors are required to be informed about all the service locations where the Enrolled provider provides services. Hence if a provider is going to provide services at a new location where they are not enrolled, there should be a workflow followed to ‘Add Location’ in a similar way as the enrollment workflow is followed.
Providers should be marked as ‘In Network’ for a particular location for them to provide services to any patient from that location (if enrollment is required according to the contract).
Add to Enrollment Queue
Clicking on the ‘star’ mark in front of the payor location adds the enrollment request in the queue for credentialing teams.

On clicking on the ‘star’ button will change its state. It signifies that the enrollment has been added to the queue. The corresponding payor tile will also jump up in the list if there is any ‘starred’ location in it.
![]()
Once an Enrollment request is added, status changes from “Not Enrolled” to either “Missing Requirements” or to “Pending Initial Review”. Providers will be also able to see these statuses once either enrollment is added to the queue or the process is started.
Enrollment Details
Clicking on the ‘pencil icon’ on Payor on Enrollment page will take you to the Enrollment Details page.

On the Enrollment Details page, you can review the status of the Enrollment for each service location within the selected payor.
Enrollment Status Workflow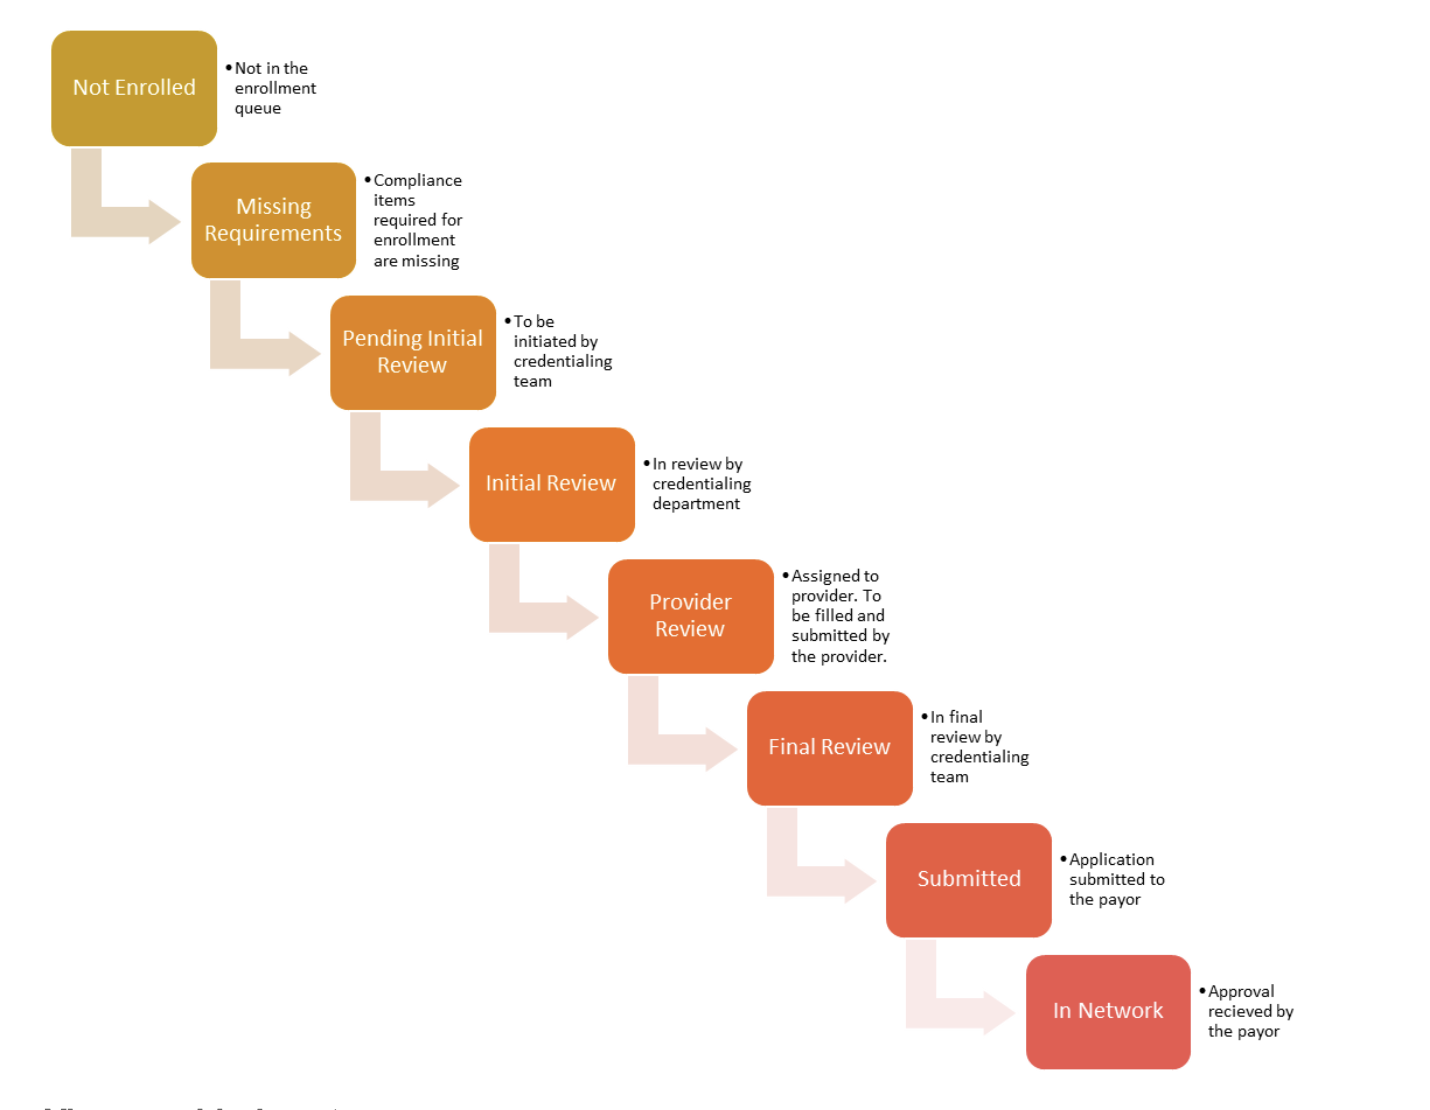
View provider’s notes
You can view the notes sent by the credentialing team on the Enrollment details page under the timeline section. You can reply to the note by clicking on ‘reply’ button under the provider’s note. These notes are payor specific.

10.3.3 Add a note for the provider
You can add a note for the provider by choosing “Note for provider” in notes popup. These notes will be saved in the timeline and will be visible to the provider.

10.3.4 Add an internal note
You can add a note for internal references by selecting the note type- “Cred Team Note”. These notes will be saved in the timeline but will not be visible to providers.
10.3.5 Email
You can send email to a payor or a provider directly from this page. All the sent emails are saved in the timeline for records.

These emails are sent to the recipients from noreply@automail.humanebits.com
Note: Contact your system support team if you need to configure your organization’s email ID here, so that recipients receive email from your email ID.
10.3.6 Reminder to follow up
You can set a custom reminder for any specific action for yourself. The reminder will appear on your dashboard on the set date.

This reminder will be also logged in the timeline on this page.
You can set multiple reminders at a time.
10.3.6 Dismiss reminder
A reminder can be dismissed by crossing it out from the page. The system will prompt you to add a note before you dismiss the alert. You can choose to skip adding a note.
This dismissal will appear on the enrollment timeline.
Status Override
You can override the status of any enrollment application at any time. These are the available statuses which can be utilized if enrollment workflow is not followed in ConCred and you simply want to log the current status.

- In Network
- Submitted
- Not being added/renewed: This status is particularly used if you know that this enrollment is not going to be renewed for this provider and you do not want to receive alerts for it.
- Block: Similar to ‘Not Being renewed’ this will block the associated alerts
- Reset: This will reset the status to “Not Enrolled”
Quick Info
This provides you a quick access to all the provider data.

Enrollment documents
This will give you access to all the relevant documents/forms/templates required for enrollment. These documents are added through the contract module.

Missing Requirements
You will see this status in front of any enrollment in queue, if the enrollment requirements by the payor are not added/verified in the Enrollment req. menu. You can view a list of all missing compliance items for any payor by hovering over the status ‘Missing Requirements’.
Once all the missing requirements are added, the status will change to ‘Pending Initial Review’.
Grace Period
For some enrollments, a provider's enrollment application can be submitted without having certain compliance items, however they are required to get those valid compliances within a certain time frame after enrollment. This timeframe is referred to as ‘grace period’ in the system.
While setting the compliance rules you can set the grace period to get the compliance item. This will enable you to proceed with the enrollment workflow even though this compliance item is missing.
The grace period will start from the effective date of the enrollment. An alert will be shown on the dashboard when the grace period starts and another alert when the grace period is over. Along with the dashboard, you will see an alert icon on your enrollment tile.
