
Overview
This workflow supports school-based compliance requirements.
Prerequisites
To utilize this workflow, users require the appropriate access level. To confirm access, navigate using the following steps:
-
Navigate to the Admin Module and select "Access Level"
- Select the Access Level of interest from the dropdown at the top of the screen.
- Navigate to the section called "Providers"
- Open the subsection called "Enrollments"
- Toggle School Enrollment Workflow to "On"
Adding a School Enrollment Workflow
-
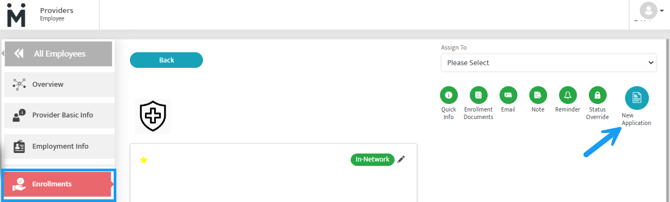
Navigate to the Provider Module
-
Select "Enrollments"
-
Select the pencil icon on the Payor Tile
-
Select "New Application"
-
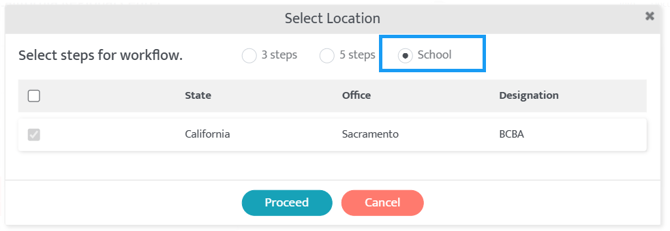
Choose "School" from the list of options
Workflow Steps and Progression
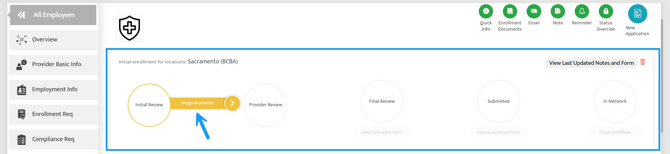
The Authorization Request Workflow consists of the following five steps:
- Provider Requirements Added
- Provider Upload
- Internal Verification
- Submit for Site Verification
- Compliant with Site
Step Assignments
- Users can assign workflow steps to specific team members.
- Assigned users will receive an email notification when they are responsible for a step.
Moving Between Steps
As progress is made, move the workflow to the next step by clicking on the button in yellow called ‘Next’.
While transitioning between steps, you can:
- Attach documents.
- Add notes for additional context or follow-up.
- Assign a step to a user
Timeline View
All actions related to the workflow are recorded in the Timeline, located at the bottom of the Workflow Page. This provides a comprehensive history of the workflow's progression.
Dashboard Alerts
When a workflow is triggered, alerts appear in the Patient Alerts Section via the Central Dashboard. These alerts show:
- The current step of each workflow.
- The assigned user for the step.
- Which step the workflow is on.
- The assigned individual.
- Any pending or overdue steps requiring immediate action.
Alert Types
Pending Alerts: Displayed when a step is in progress but not yet completed.
Overdue Alerts: Triggered when a step is not completed within the designated timeframe:
- Step 1: 3 days
- Step 2: 3 days
- Step 3: 3 days
- Step 4: 5 days
- Step 5: 5 days
Note: If you do not see alerts as expected, check your Access Level!
Additional Workflow Features
Abandon Workflow: At any point, users can choose to abandon the workflow by clicking the "Delete" button.
Last Updated: 2/20/26 by Tatum Winslow