This article will review how to create programs with multiple instruments. When using multiple instruments it is important to pay special attention to the opportunity outcome settings. In some cases, the default settings will be sufficient, but this article will review factors to consider when creating these programs.
A variety of task analysis templates and programs can be found in the Motivity Community Library and customized for your needs. In this example, we will be customizing the "Total Task Presentation" template to create a task analysis program for completing homework.
1. Choose a template and assign to your learner/library

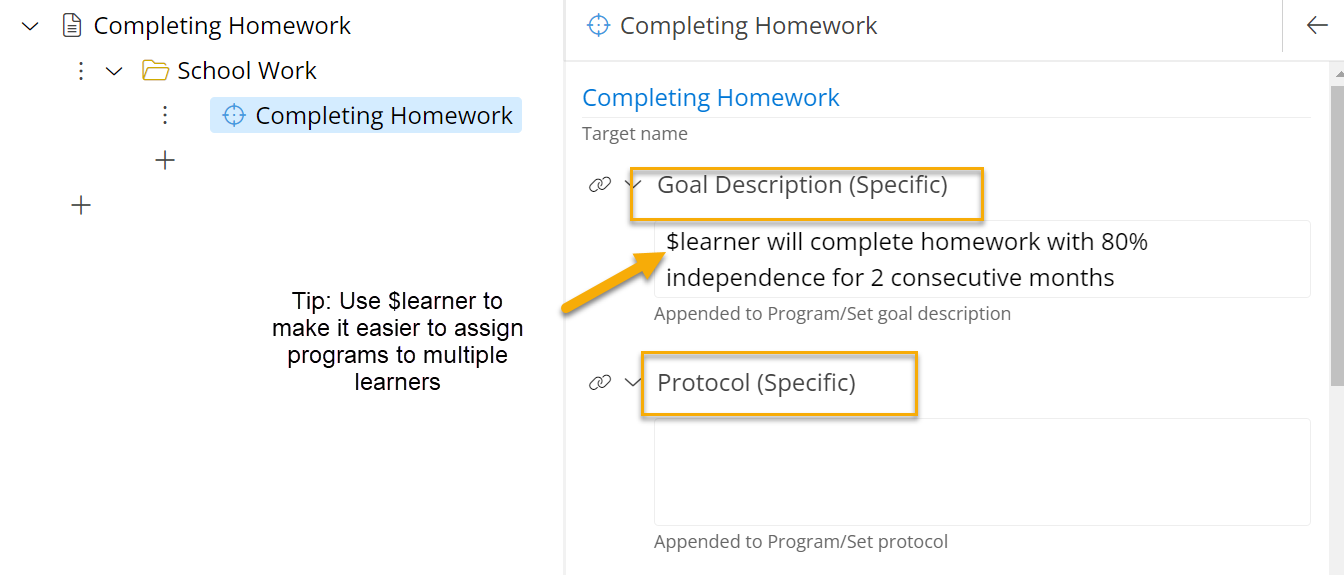
2. Open for editing and rename the target

3. Type in or copy/paste in your goal description and protocol in the appropriate text boxes
4. Set up properties to ensure the target is in the correct phase type and session type
-png.png?width=684&height=457&name=properties%20(1)-png.png)
5. Type the SD in the Key Instruction box

6. Add the steps in your TA in the "Measures and Instructions"
The template will include generic steps such as "Step 1". Rename the steps for your target. 
You can add more steps by clicking on the three dots next to the last step and clicking "Clone". You can also click on "+ Measure" to add more steps. 
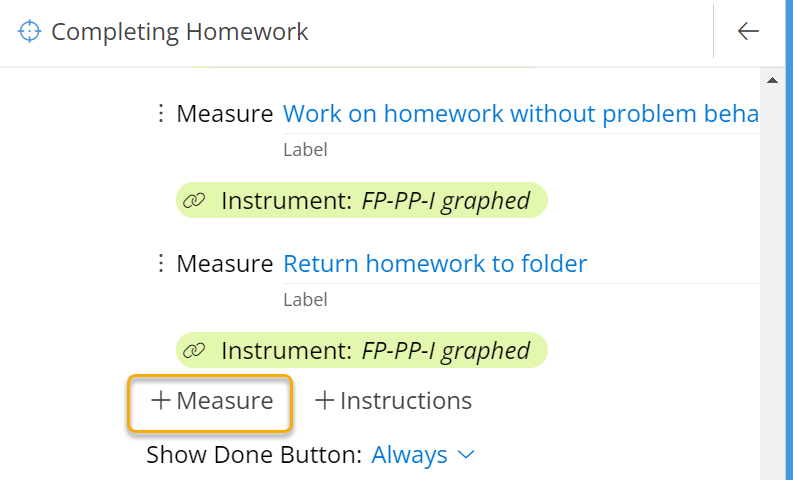
Click on the three dots next to a measure to move that step around, clone it, or delete it.
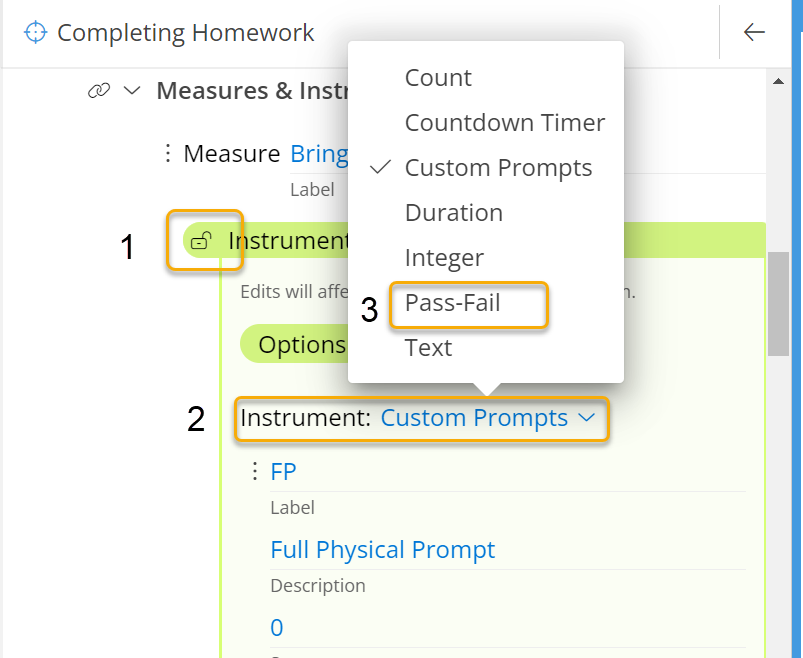
7. Adjust the instrument type for all steps
This template includes a custom prompt instrument for full physical, partial physical, and independent prompts options. You can customize your own prompting level or use another instrument type, such as pass/fail. In this example, we'll change our instruments to a simple pass/fail option.
Tip: Use local parameters (these are already set in most templates) to change instrument options for all measures quickly.
8. Set Opportunity Outcome
The opportunity outcome section specifies how each attempt or opportunity at the task analysis will be scored and what will be considered a successful and failed attempt.
The Opportunity Score will allow you to specify how the task analysis will the scored. The default is to average all measure scores together. However, you can change it to average, sum, minimum score, or maximum score.

The Opportunity Success Criteria allows you to specify the criteria under which each attempt at the TA is a success or failed attempt. The default on a task analysis target is to succeed if all steps are correct and fail if any one step fails. You can adjust the success criteria for other needs (see below). 
BASIC RULES
The basic rules will record an opportunity or attempt as successful if all measures are a specific score. In the example below, these basic settings will record the opportunity as correct if all score are 100.

ADVANCED RULES
The advanced rules allows you more control over the rules for success. You can create multiple rules.
Rules are either a "Score Rule" or "Usage Rule". A score rule will specify what the score of the measures must be (like in the basic rules) while a usage rule specifies how many measures must be filled in.
Note: You cannot have a score rule and a usage rule that both specify a "success" criterion. The following example will show you how to set a score rule and usage rule that work together.
In this example, we would like an attempt at completing homework to graphed as successful if the average of the instrument scores is 80 AND at least 5 of the measures are filled in (e.g., we cannot skip more than 6 steps in our 11 step TA).
To set this up, we will create two rules. One for the usage rule and one for the score rule - as seen below.
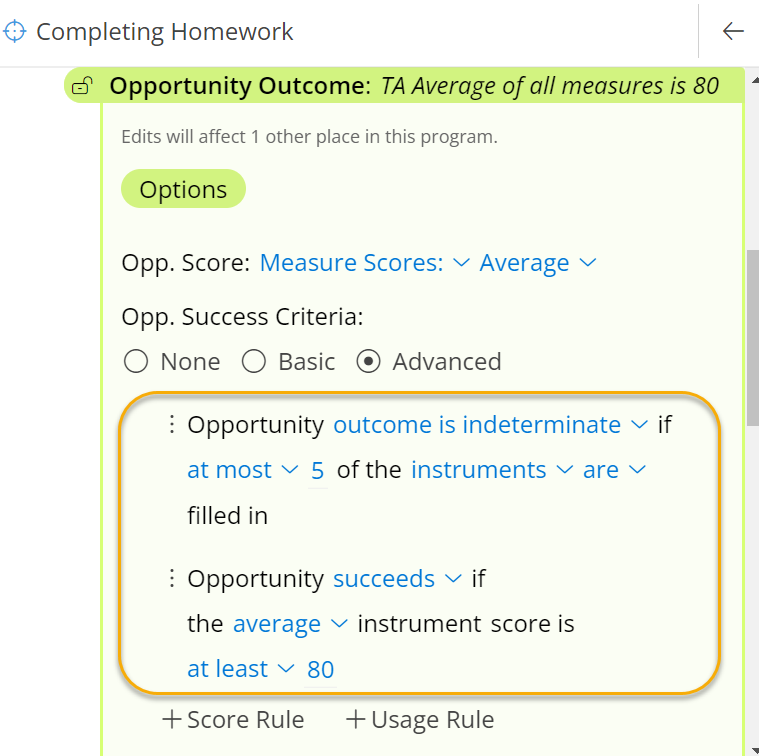
Usage Rule:
In the usage rule we will specify that the outcome will be "Indeterminate" (neither successful or failed) if "at most" 5 of instruments are filled in. This rule will only allow an opportunity to be scored as successful if 6 or more of the instruments of the 11 are filled in.
You also have the option to change the criterion based on instruments that are NOT filled in. You can also further specify that the set number of instruments must be within a specific range. For example, you can specify that an outcome will be indeterminate if "at most 5 of the first 8 instruments are filled in" - meaning the rule will only apply to the first 8 steps in the task analysis.
Score Rule:
The second rule will specify the scoring criterion. In this case, an attempt at competing homework is successful if the average instruments score is 80.
Combined, this creates a rule that an attempt will only be scored as successful if between 6-11 instruments are filled in and all those filled in average to 80.
Hint: Always test out your opportunity criteria in the simulation to ensure it works as you intend.
If you are interested in viewing other examples of task analysis opportunity outcomes, please see this article (examples are included under the "Mode: Advanced" section): Opportunity Outcome
9. Set the Session Outcome
While the Opportunity Outcome specifies success/failure for each attempt at the task analysis, the Session Outcome specifies success/failure for the whole session (all attempts together).
The Session Score will allow you to specify how all opportunities/attempts will the scored. The default is to average all opportunities together. However, you can change it to average, sum, minimum score, or maximum score. 
The Session Success Criteria allows you to specify the criteria under which the session is successful or failed.
BASIC RULES
The basic rules will record a session as successful if a specified percentage of at least a specified number of trials are correct. For example, if 90% of at least 5 trials are correct. 
ADVANCED RULES
The advanced rules allows you more control over the rules for success, failure, or indeterminate sessions. You can create multiple rules.
In our example, we set the session to be successful if at least 1 opportunity is completed and all opportunities succeed. We also set a rule that it will fail if at least 1 opportunity is completed an any 1 opportunity fails. Since our task analysis is for completing homework, it is likely there will only be one opportunity per session/day to work on this program, making rules based on 1 opportunity an appropriate setting.

10. Set up Transition Rule
The transition section allows you to specify when a target moves across phases or is completed.![]()
BASIC RULES
The basic rules are frequently sufficient. Basic rules transitions the target after a specified number of successful sessions in a row. For example, it will move to the next phase after 3 successful sessions in a row. If there is no phase programmed after the current phase, the target will move to completed.
ADVANCED RULES
If you need a more specific rule or a rule that allows you to move backwards to a previous phase or to a specific phase, you will need to use advanced settings.
In this example, we will set a rule that if 5 sessions in a row succeed, the target will move to the next phase; however, if there are 3 failed sessions in a row, the target will move to the previous phase for retraining. ![]()
11. Creating new phases
Once you have set up one phase how you like, you can clone that whole phase to create multiple phases. This is useful if you want to have a baseline phase, maintenance phase, or if you are teaching using a procedure such as forward or backward chaining (where each phase specifies the steps that should be completed independently).
To clone: click on the three dots to the left of the phase, click on "Clone". This will create a new identical target. Change the phase type or name of the custom phase so that each phase has an individual name. 

Last update: 12/29/22