This article describes how to configure the Target Interface in the Program Builder. The Target Interface is made up of three main sections.
1) Key Instruction
2) Measures and Instructions
3) Opportunity Outcome
-png.png?width=688&height=443&name=mceclip0%20(18)-png.png)
This article has the following parts:
- What is the Target Interface
- Key Instructions
- Measures
- Instruments
- Affecting Outcomes
- Target Instructions
- Show Done Button
What is the Target Interface?
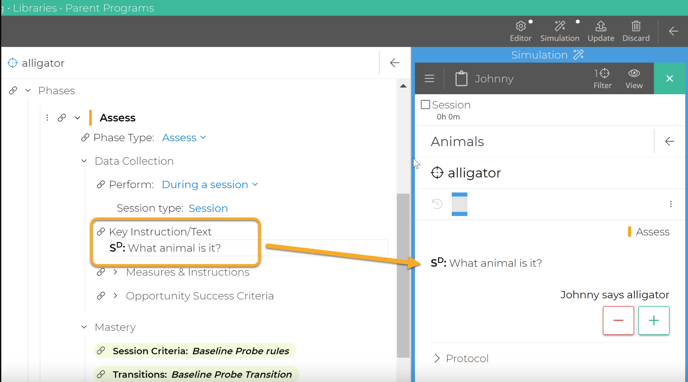
The Target Interface defines what the user sees when collecting data for the target in this phase. It consists of a list of the Key Instruction, interleaved Instructions (text blocks) and Measures (labeled instruments for collecting data). The Simulation panel (to the right or under the configuration panel) lets you see exactly what the Target Interface will look like, updating automatically as you make changes to the configuration:-png.png?width=688&height=285&name=mceclip1%20(12)-png.png)
The Target Interface consists of the Key Instruction (short instruction) and a list of Measures and Instructions (longer instructions). When a new Target is created, the list is empty except for a single Measure. The type of Instrument used in the initial default Measure depends on what type of target was created: a Skill Target starts with a Pass-Fail Instrument, and a Behavior target start with a Count Instrument.
-png.png?width=688&height=315&name=mceclip7%20(2)-png.png)
-png.png?width=688&height=449&name=mceclip8%20(2)-png.png)
You can modify these default Instruments as needed, using the Target Interface controls as described below.
Key Instruction
This is a short description or instruction that is displayed under a target and above the Measures & Instructions. This allows you to keep the Target Interface more generic, making it reusable via a parameter, if you choose to do so.
Expert Tip: Using the special variables "$target" and "$learner"
You may reference the target name and learner name in any text using the special variables $target, and $learner as shown in the example above ("point to $target"); wherever you type $target or $learner, it will be replaced with the actual target or learner name in the text that the user sees. This is especially useful if you have multiple targets that would be identical except for the target name appearing in the labels and instructions, allowing you to create one target definition for all the targets using the [Uniform Target Generator] or [Parameters
Good examples include
- the SD
- the instruction the BT/Therapist gives to occasion the behavior
- examples to clarify the target.
Measures
Every Measure consists of two components: the Measure Label (text that appears directly above the instrument), and the Instrument that defines the form fields and buttons for collecting user input (e.g. Pass-Fail, Text Input or Count).
Measure Label
The Measure Label is any text that you want to appear above the instrument, as depicted above ("points to pencil"). It can be descriptive or generic ("responds correctly"). For example, in Task Analysis, the measure label is typically the description of the step being performed.
-png.png?width=688&height=319&name=mceclip0%20(19)-png.png)
It's an ideal place to put the Response Definition or Behavior Definition.
-png.png?width=688&height=282&name=1609984645426%20(1)-png.png)
In addition to appearing directly above the Instrument when collecting data, the Measure Label also appears when you view data by drilling down to the detailed opportunity data that was collected:
-png.png?width=688&height=373&name=mceclip3%20(8)-png.png)
Questions to ask yourself when deciding on what to put in the Measure label:
- Is it short? Measure labels are repeated in the data tables for every measure. If it's more than a few words, it will clutter up those tables. It's better to put longer text as an Instruction.
- Does it communicate the purpose or scope of the Measure? Since it appears right above the Instrument, it's a good place to clearly remind the person collecting data what that instrument is for.
- If the target has multiple measures (e.g. steps in a Task Analysis), do the labels distinguish each Measure from the others?
The Measure Label may be left blank if there is just one Measure in a target.
Multiple Measures
Most targets have just one Measure, but you can add as many Measures to the target as you want. For example, in a Task Analysis, each step is typically its own Measure:
-png.png?width=688&height=611&name=mceclip9%20(2)-png.png)
To add a Measure, click the +Measure button:-png.png?width=688&height=635&name=mceclip5%20(4)-png.png)
Alternatively, if the New measure will share some properties of an existing Measure, you can save time by "cloning" the existing Measure, using the 3-dot menu:-png.png?width=688&height=447&name=mceclip6%20(3)-png.png)
You can also use the 3-dot menu to rearrange Measures and Instructions (move them up or down) or delete them.
Expert Detail: Measure Labels must be unique
No two measures may have the same label for a given target in a given phase. If you attempt to create two measures with a single label, you will see an error message requiring you to assign an unambiguous label to each measure. -png.png?width=671&height=697&name=mceclip2%20(11)-png.png)
Instruments
Each Measure consist of the Measure Label (described above) and an Instrument specification. The Instrument specification determines the form fields and buttons that receive input from the user, such as the Pass-Fail buttons shown in the example above. Motivity supplies numerous types of Instruments which can be selected from the Instrument Dropdown. The type of Instruments chosen will determine the type of data yielded by the target, and may determine what is used for the Y-axis of the target performance chart.
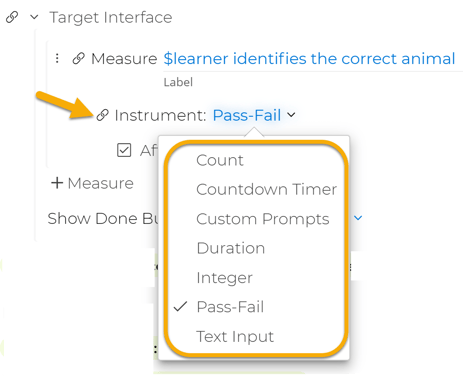
Each Instrument is described in detail in the following articles:
- Count (You can track the total occurrences or the rate of occurrences per hour)
- Custom Prompts (Use for prompt hierarchies or custom buttons with custom scores)
- Integer (A number or score)
- Pass-Fail (Percent Correct)
- Duration (Total Duration per session, Stopwatch, Manual or Fixed)
- Countdown Timer (just a tool to use for data collection)
- Text Input (text box for anecdotal or qualitative data)
Affecting Outcomes
Most instruments can affect the Opportunity Outcome, which in turn affects the Session Outcome. To control whether or not an Instrument affects the Outcome, use the "Affects outcome" checkbox at the bottom of the Instrument:-png-1.png?width=468&height=233&name=mceclip4%20(6)-png-1.png)
Note: some types of Instruments, such as Text Input, are not able to affect outcome.
Each Instrument yields a "Reading", which is comprised of alphanumeric text (typically the label of the button that was pressed, such as the character "+" or "-") and a numeric score (e.g. "100" or "0" for Pass-Fail, or the value of a Count). The Instrument Readings are displayed in the detailed opportunity data table in the Session history, including the identity of the user who took the reading (pressed the button), and the timestamp for each Reading.
Usually, a target has exactly one Measure, with one Instrument Reading affecting the Outcome. In that situation, the Opportunity Outcome score will be equal to the Instrument Reading score. If the target has multiple Instruments that affect the Outcome (e.g. a Task Analysis target in which each step has its own Measure), the Instrument Reading scores will be aggregated to determine the Opportunity Outcome score. You can control how they are aggregated (sum, average, minimum, or maximum) in the Opportunity Outcome section of the Program Builder.
Target Instructions
The Instructions component allows you to write blocks of text that will appear interleaved with measures. To create a new Instructions block, click "+Instructions":-png.png?width=688&height=635&name=mceclip4%20(7)-png.png)
Click inside the text box to type or paste in instructions. You can use the text editor toolbar to make formatting changes.-png.png?width=688&height=265&name=mceclip2%20(12)-png.png)
Instructions are a good place to put critical details that you want to always be on screen when collecting data. Users will not be able to collapse or hide these Instructions when collecting data, so be careful about putting a lot of text here. Lengthy details can be relegated to the [Protocol] section, which the user can collapse/expand at will.
Show Done Button
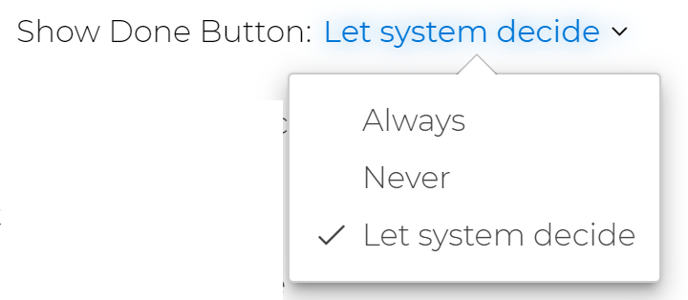
After the list of Measures and Instructions, the final component of the Target Interface is the "Show Done Button" which lets you control when the Done button is displayed when collecting data.
If a Done button is present, then the user must click it to end an opportunity and advance to the next one:
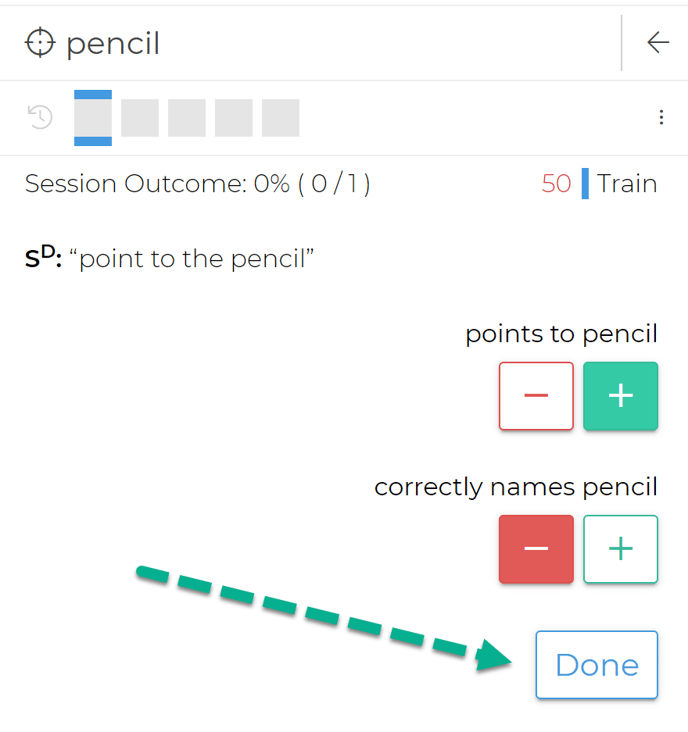
If a Done button is not present, then the opportunity will end as soon as a Reading is taken. E.g. pressing a "+" or "-" here will end this opportunity immediately and advance to the next one:
By default, the choice is "Let system decide", which behaves as follows:
- Show the Done button when:
- there are two or more Measures, or
- when there is a single measure is of type Count, Duration, Countdown Timer, or Text Input.
- Don't show the Done button when:
- there is a single Measure of type Pass-Fail, Custom Prompt, or Integer
If you want to explicitly control when the Done button is shown, change the dropdown to "Always" or "Never".