This article describes the Custom Prompts Instrument that can be found in the Target Interface of a Phase in the Program Builder.-png.png?width=688&height=644&name=mceclip0%20(28)-png.png)
This article has the following sections:
- What is the Custom Prompts Instrument?
- Creating a Measure with Custom Prompts
- Automatically Assigned Prompt Scores
- How Prompt Scores Affect the Opportunity Score
- Button Colors
- Use Custom Scores
- Affects Outcome
What is the Custom Prompts Instrument?
Custom Prompts is a type of Instrument (part of a Measure in the Target Interface) that allows you to define a series of labeled buttons to be used during data collection. For example, you can model a prompt hierarchy:-png.png?width=458&height=148&name=mceclip1%20(18)-png.png)
A Yes/No question:-png.png?width=261&height=133&name=mceclip2%20(16)-png.png)
Or any arbitrary set of buttons of your devising:-png.png?width=512&height=148&name=mceclip3%20(12)-png.png)
Custom Prompts acts like a "radio button" selector: only one choice can be active at a time for a given instrument in an Opportunity. E.g. pressing "I" here will result in "V" being no longer selected:-png.png?width=688&height=108&name=mceclip4%20(11)-png.png)
Note: Sometimes opportunities auto-advance
If the interface is configured to advance automatically to the next trial after input is received (which is the default behavior when a target has only one Measure), then when a button is pressed, the target interface will immediately be replaced by the next trial, which has no button pressed yet: -png.png?width=688&height=236&name=mceclip5%20(7)-png.png)
Rest assured, the button is still "pressed" for the previous trial. Clicking on the square for the recently completed trial (in the bar under the target name) will navigate back to that trial and show the selected button:-png.png?width=503&height=442&name=mceclip6%20(5)-png.png)
The label of each Prompt that was pressed during data collection will appear in the target history data, to the left of the measure label. The clipboard icon indicates that they are of type Custom Prompt:
Supporting Multiple Independent Selections
Motivity currently does not offer an Instrument that allows more than one button to be selected simultaneously. However, you can achieve this using multiple Measures, each with a Custom Prompts instrument with a single button:-png.png?width=688&height=553&name=mceclip12%20(3)-png.png)
Creating a Measure with Custom Prompts
Open the Target Interface of a Phase for a target in the Program Builder. New Skill Targets are created with a single Measure that has a Pass-Fail Instrument by default. To change it to Custom Prompts: open the drop-down menu containing Pass-Fail, and switch it to Custom Prompts:-png.png?width=688&height=515&name=mceclip7%20(3)-png.png)
Alternatively, if no Measure exists, or if you want to create an additional Measure rather than take over the existing one, click +Measure then in the new Measure you can change the Instrument from Pass-Fail to Custom Prompts:-png.png?width=647&height=421&name=mceclip8%20(5)-png.png)
Note: All Measures consist of just two things: a Measure Label (identifying text), and an Instrument (with any associated Instrument configuration). A target may have as many Measures as you want to create, each of which has its own Instrument.
Once the Instrument has been set to Custom Prompts, you will see the Custom Prompts configuration interface. The first step is to create a new prompt (button) by clicking +Prompt:
-png.png?width=688&height=420&name=mceclip9%20(3)-png.png)
This will create a Prompt element, which consists of a Prompt Label (what appears on the button), and a Description (currently not used in Data Collection). Enter the Label that you want to appear on the left-most button:-png.png?width=593&height=356&name=mceclip11%20(2)-png.png)
Repeat this process, pressing +Prompt and entering labels, for all the buttons that you want to make. Note: if you do not provide a label, the system will display a +, -, or checkmark on the button, depending on whether that button would contribute towards the trial's success, failure, or not affect the outcome. See How Prompt Scores Affect the Opportunity Score below.
A Note about Prompt Descriptions
The Prompt Descriptions are currently not displayed in the Data Collection interface, but we plan to add a feature which will display it if the user hovers over or long-presses the button. For now, they're only visible in the Program Builder.-png.png?width=688&height=469&name=mceclip10%20(4)-png.png)
You can re-order, delete, or clone a Prompt by using the controls in the 3-dot menu to the left of each Prompt:-png.png?width=601&height=456&name=mceclip13%20(2)-png.png)
Automatically Assigned Prompt Scores
Each Prompt has a score associated with it, which becomes the numeric value yielded by the Measure when that button is pressed. These scores are important because they affect the success or failure of the Opportunity.
By default, Prompt scores are assigned automatically. The leftmost button is assigned 0, the rightmost is assigned 100, and the remaining buttons are given scores in between. Here are the scores automatically assigned to buttons, from left to right:
- Two buttons: 0, 100
- Three buttons: 0, 50, 100
- Four buttons: 0, 33, 66, 100
- Five buttons: 0, 25, 50, 75, 100
How Prompt Scores Affect the Opportunity Score
The Custom Prompt Instrument score (generated by pressing a button) is combined with the scores of any other Measures in the target interface (if there are multiple Measures), to yield the Opportunity score that determines whether the Opportunity succeeds or fails. In the example below, the right-most button is pressed, yielding a score of 100, and since there is only one Measure in the target, that value becomes the Opportunity score, which in turn results in a Success outcome because it causes the "succeed if..." rule to fire (defined in the Opportunity Outcome section):
-png.png?width=688&height=256&name=mceclip16%20(2)-png.png)
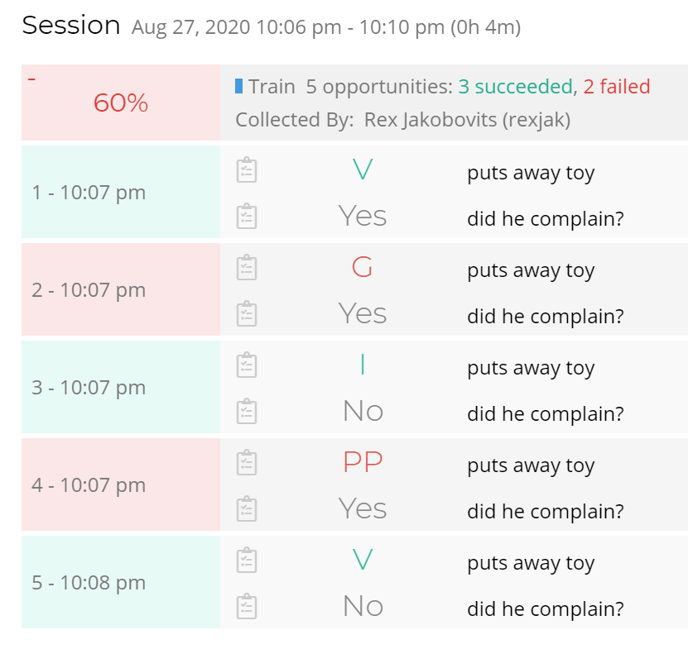
By contrast, here is an example of an Opportunity failing because the middle button ("G") was pressed, yielding a score of 50, which causes a different rule to fire:
-png.png?width=572&height=207&name=mceclip17%20(1)-png.png)
The Opportunity score is visible during data collection under the Opportunity bar, to the right of the Session Outcome:
-png.png?width=688&height=394&name=mceclip15%20(3)-png.png)
In this case, the Opportunity score is 50, which represents the score of the middle of five buttons.
Note: if the Opportunity is configured to advance automatically (which it is by default if there is only one Measure) then the completed Opportunity's score will not be visible unless you look at the previous Opportunity by clicking on its square, as in the example above.
If there are multiple Measures in a target, then the Opportunity Score is computed as a combination of the scores of each of the Measures: either their Average, Sum, Minimum, or Maximum. Learn more about this in the [Opportunity Outcome] article.
Button Colors
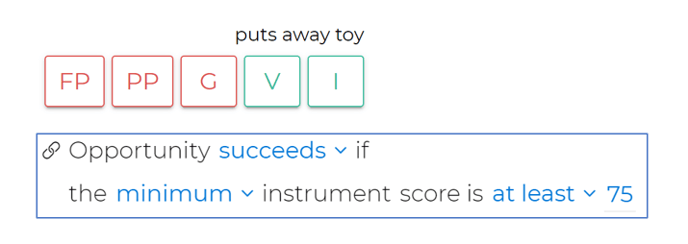
The color of a button is determined by the score it yields and how it interacts with the Opportunity Outcome rules: it is green if the button would contribute towards a successful Outcome, red if it will contribute towards Failure, and grey if it does not affect the outcome. In the above examples, only the rightmost button ("I") is green because the Opportunity Success Criteria rule states that the minimum score for success is 100. However, if that threshold is lowered to 75, then the two rightmost buttons both appear as green:
Use Custom Scores
You can also assign custom scores to Prompts, by clicking the "Use Custom Scores" checkbox and then filling in the score value for each Prompt:
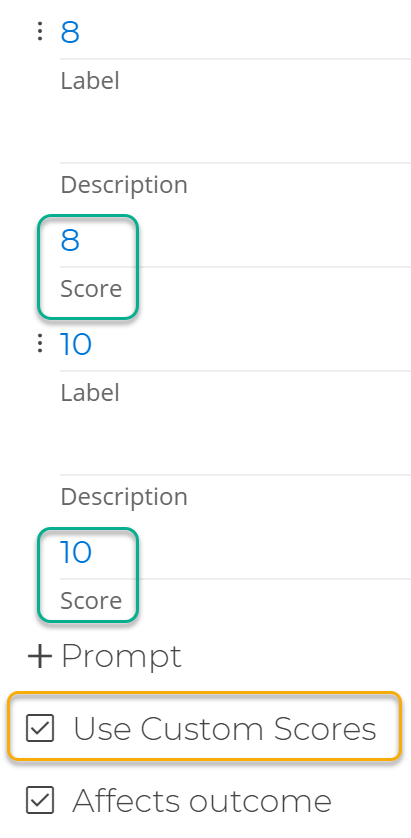
Most of the time, automatic score assignment is sufficient, but Custom Scores can come in handy in situations where you want the Opportunity score (and possibly the Session Outcome) to reflect performance using a predefined scoring system. For example, you can use Custom Scores to implement the PEAK scoring, where the learner is assigned a score of 0, 2, 4, 8, or 10 for each of ten separate tasks, and the scores of all those tasks are added up to determine a performance score:

To learn more about this, read [Opportunity Score Calculation] and Session Score Calculation.
Affects Outcome
The last control in the Custom Prompt Instrument is the "Affects outcome" checkbox. By default, it's checked, which means that the score of the Instrument will be factored in to the Opportunity Outcome score. However, sometimes you want a Measure to collect anecdotal information that you don't want to affect the Opportunity Outcome, in which case you can deselect the "Affects outcome" checkbox. This will make all the buttons of that Instrument grey, since they no longer affect Outcome:
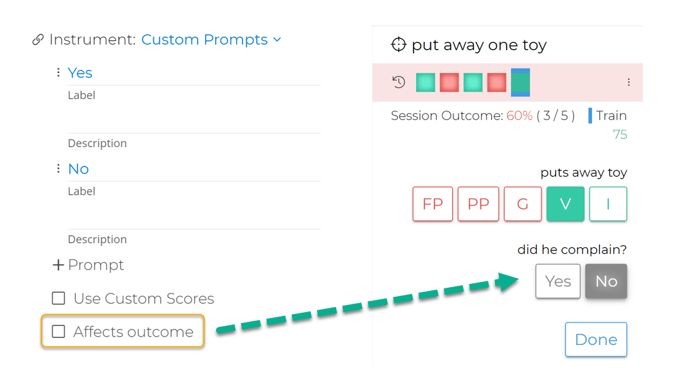
The values of all the chosen Prompts will be visible in the target history data, regardless of whether they affect outcome or not: